How to Record Audio in Sound Forge Pro
Sound Forge Pro is not what most people reach for when they think "recording." That's Audacity, or a DAW. But if you need to capture audio at high resolution — a single stereo input, a multi-channel session, or an unattended recording triggered by a threshold — Sound Forge handles it cleanly, and the recording workflow is more capable than most of its documentation suggests.
Most problems with recording in Sound Forge are solved before you hit the Record button — driver configuration, Windows permissions, file setup. Get that right and the actual recording workflow is straightforward.
Before You Record: Windows Microphone Permissions

Sound Forge Pro on Windows requires microphone access to be enabled in Windows Security settings before it can see any input device. This catches a lot of people who installed the software, connected their interface, and got silence — with no error message explaining why.
Go to Windows Settings → Privacy & Security → Microphone. Make sure "Let desktop apps access your microphone" is switched on. The toggle is at the bottom of the page and easy to miss. Once that's enabled, Sound Forge will see your inputs.
This applies to built-in audio, USB microphones, and external interfaces equally. If Sound Forge isn't showing your input device in the Record dialog, this is the first place to check.
Setting Up Your Audio Driver (ASIO vs Windows Drivers)
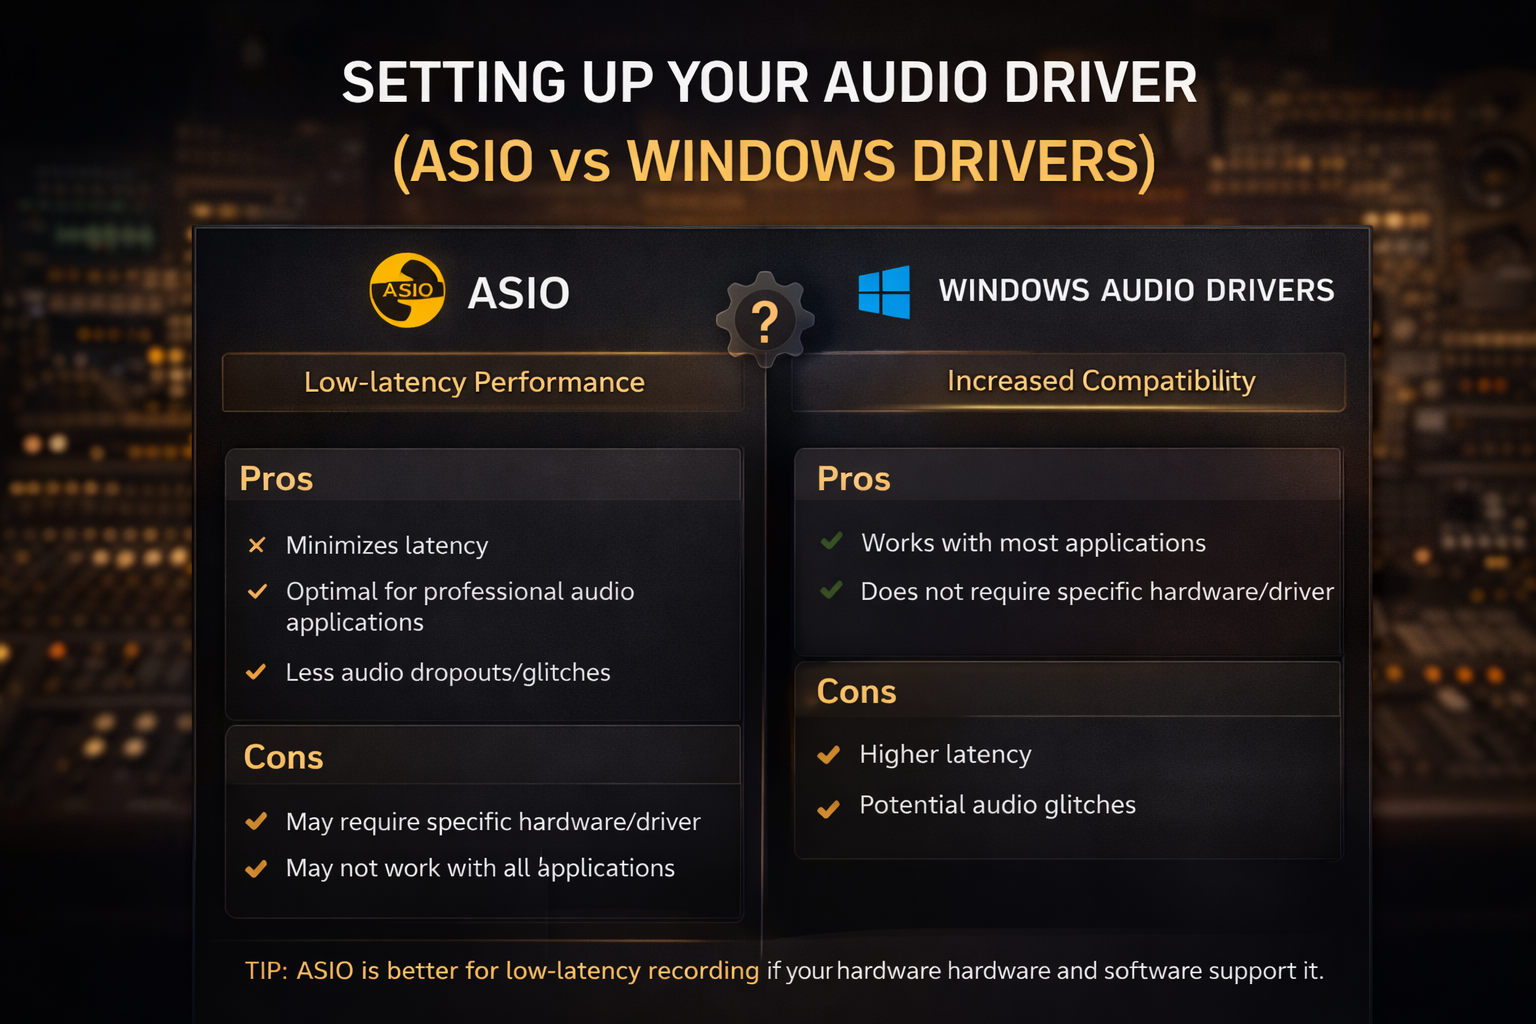
Sound Forge Pro supports three driver types in the Audio Preferences: ASIO, Windows Classic Wave, and Microsoft Sound Mapper. For any serious recording work, ASIO is the right choice — lower latency, direct hardware access, and support for multi-channel setups on interfaces that have it.
To configure your driver: go to Options → Preferences → Audio tab. Select your driver type from the "Record device type" dropdown. If you're using an audio interface with ASIO drivers installed, it will appear in the list by name — Focusrite ASIO, RME ASIO, UA Apollo ASIO, whatever your hardware ships with.
With ASIO selected, click the Advanced button. This opens the Advanced Audio Configuration dialog, where you can click Configure to open your interface's own ASIO control panel — buffer size, sample rate, I/O routing. Set buffer size low enough for responsive monitoring (64–128 samples is typical for most interfaces), but high enough that you're not getting audio gaps. If you hear dropouts during recording, increase the buffer. Hardware requirements for high-resolution recording are covered in the Sound Forge Pro system requirements.
If you don't have an external interface and are recording from a built-in microphone or simple USB mic, Windows Classic Wave or Microsoft Sound Mapper will work. They're not low-latency, but for spoken word capture or anything where real-time monitoring latency doesn't matter, they're fine.
Opening the Record Dialog
Click the Record button on the Transport toolbar — it's the circle with a red dot. The Record dialog opens.
Before you click Record, you'll want a file ready to record into. Either open an existing audio file and record into it, or create a new one: File → New, set your sample rate, bit depth, and channel count, then open the Record dialog. By default, Sound Forge records into whatever data window is currently active.
The Record dialog shows your input levels in real time. Watch the meters before you arm — you want peaks hitting around -12 to -6 dBFS on loud passages, with enough headroom that transients won't clip. If you're not seeing any meter movement at all, go back and check the Windows microphone permissions and your driver selection.
To see expanded metering and monitoring controls without cluttering the main Record dialog, go to View → Record Options. This shows the phase scope, VU/PPM meters, and mono-compatibility meter as separate panels. Useful when you're recording stereo material and need to verify phase correlation.
If You're Not Getting a Signal
No input devices in the Record dialog: Windows microphone permissions. Check Settings → Privacy & Security → Microphone → "Let desktop apps access your microphone." The toggle for desktop apps is at the bottom of the page — easy to miss. This is the first thing to check before anything else.
Recording in mono when you expected stereo: Two places to check. In File → New, confirm the channel count is set to 2. In Options → Preferences → Audio, confirm the record device routing shows separate left and right channels, not both pointing to channel 1.
Audio gaps or dropouts during recording: Buffer size is too small. Open your ASIO control panel through Options → Preferences → Audio → Advanced → Configure, and increase the buffer. Also try disabling input monitoring in the Record dialog — monitoring adds overhead, and on slower systems it causes gaps.
Want to record system audio (what you hear through speakers): Sound Forge doesn't have a built-in loopback option. In Windows Sound settings, enable "Stereo Mix" as a recording device (right-click in the Recording tab to show disabled devices), then select it as your record source in Sound Forge's Audio Preferences. Not all audio interfaces support Stereo Mix — if it's not showing up, your interface likely doesn't expose it.
Threshold recording not triggering: Threshold is set too high for the signal. Bring it down. Watch the meters while you're armed — the input needs to visibly cross the threshold fader position to start recording.
Takes disappearing: You're in Automatic retake mode. Each take overwrites the previous one. Switch to Multiple takes in the Mode dropdown if you need to keep every pass.
Choosing a Recording Method
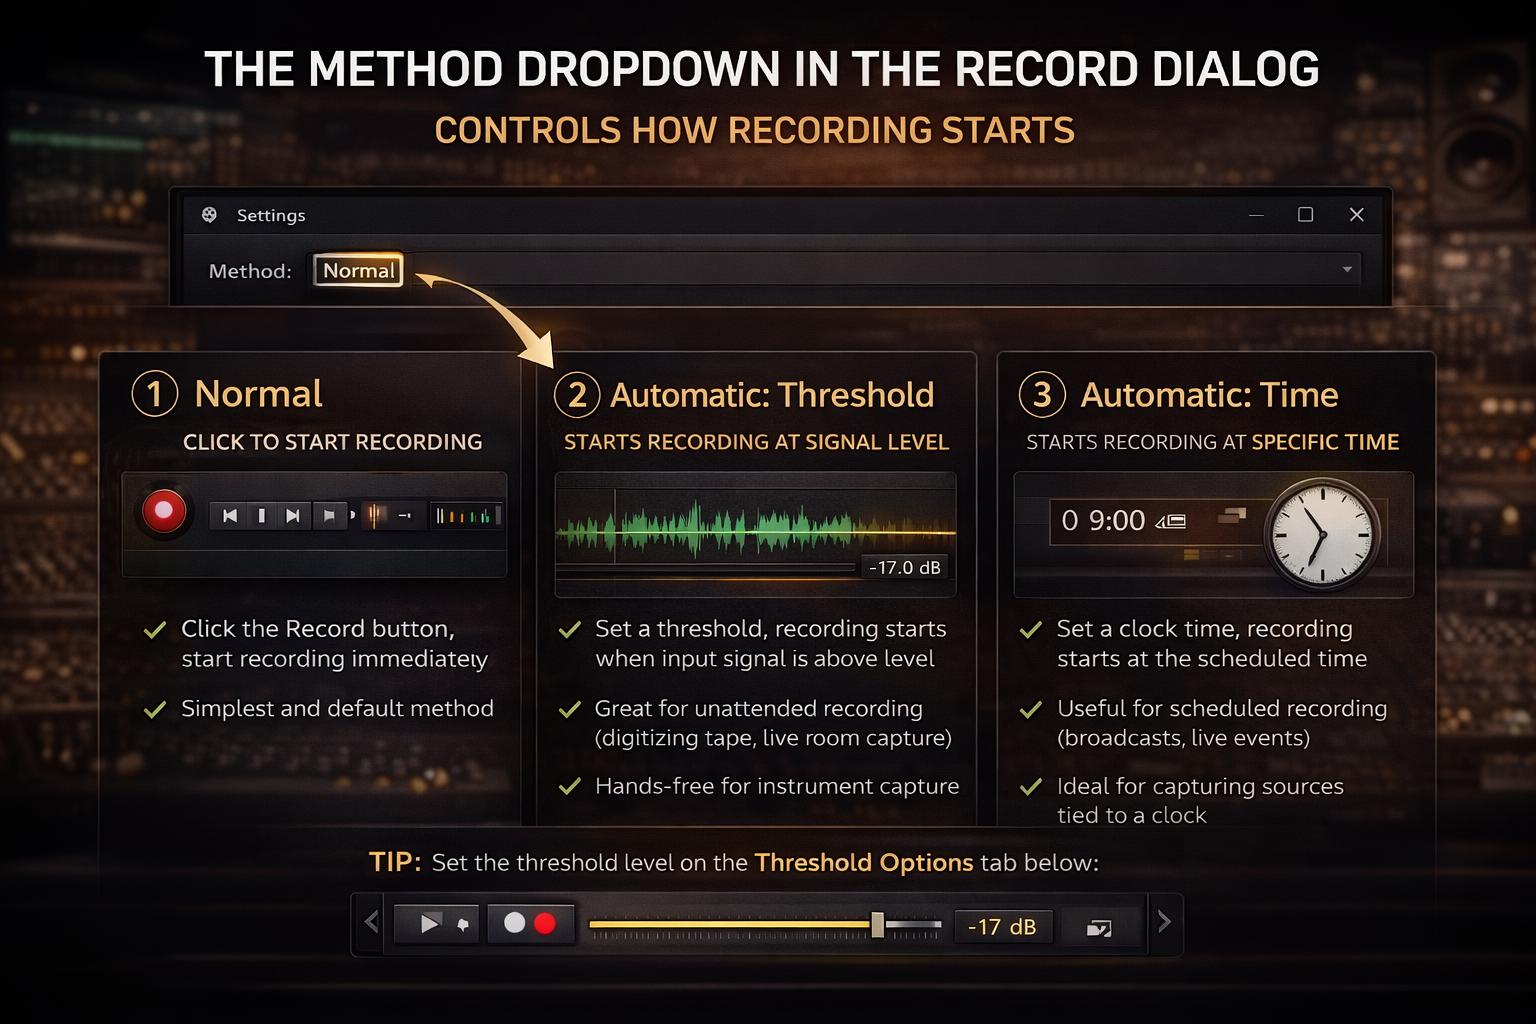
The Method dropdown in the Record dialog controls how recording starts. Three options:
Normal is the default. Click the Record button in the dialog, recording starts immediately, click Stop when you're done. The simplest approach and the right one for most situations — voiceover, instrument capture, anything where you're present and in control.
Automatic: Threshold starts recording when the input signal crosses a level you set. You arm the recording, Sound Forge waits, and the moment the input reaches the threshold, it starts capturing. This is useful for unattended recording — digitizing tape, capturing live room audio, or recording situations where you need both hands on the instrument and can't click a button. Set the threshold on the Threshold Options tab below: drag the fader to the level where recording should begin, and optionally set a level at which recording should stop when the signal falls back below it.
Automatic: Time starts recording at a specific clock time you specify. Set the start time, arm the recording, and Sound Forge waits until that moment. Useful when you're capturing something scheduled — a broadcast, a live stream, or any source tied to a clock.
Choosing a Recording Mode
The Mode dropdown controls what happens to recorded data and where the cursor goes after each take. Three options that matter:
Automatic retake rewinds to the start position after every take. Record, stop, the cursor goes back to the beginning. Record again, it overwrites the previous take. This is the fastest workflow when you're doing short repeated takes — testing a mic placement, checking a line reading — because you don't have to manually rewind between attempts. The downside: every take replaces the last one.
Multiple takes keeps recording forward from where the previous take ended. Each time you stop and re-arm, the start position advances. Takes stack up in the file as you go. Use this when you want a complete archive of every take without overwriting anything.
Punch-In records over a specific selection in an existing file. Select the region you want to replace, open the Record dialog, and recording begins at the selection start and stops at the selection end. The rest of the file is untouched. This is for correcting a specific section of an otherwise good take — a cough mid-sentence, a note that went flat, a line that needs a second pass.
The Prerecord Buffer
If you've ever missed the first half-second of a take because you were slow on the button, the prerecord buffer fixes that permanently. It's on the Advanced tab at the bottom of the Record dialog.
Enable the checkbox and enter a value in seconds. Sound Forge continuously buffers that amount of audio while you're armed, before you actually start recording. When you click Record, the buffer gets committed to disk — so the recording starts that many seconds before you clicked.
With threshold-triggered recording, this means if you set the threshold slightly too high and the initial transient is quiet, the buffer catches what would otherwise be missed. Set a 5-second buffer, and even if the signal crept up slowly to the threshold, you have 5 seconds of approach captured.
With normal recording, the buffer works differently — it captures audio before you click Record, so if you're slow to click the button, you don't lose the first word or the first note. A 10-to-15-second buffer is a reasonable default when you're recording takes where the exact start point matters.
Note: the prerecord buffer is unavailable in Punch-In mode.
Multichannel Recording
Sound Forge Pro records up to 32 simultaneous channels at up to 64-bit/192 kHz — the full resolution the format supports. This requires an audio interface with enough I/O and the correct ASIO driver configured.
Set up your channel count in File → New before recording — specify the number of channels to match your input configuration. In the Preferences Audio tab, make sure your ASIO driver is selected and the input routing maps correctly to the channels you're using. The Record dialog shows meters per channel, so you can verify signal on each input before committing.
Multi-channel recording in Sound Forge writes into a single interleaved file. It's not a multitrack session — there's no timeline, no individual track editing. You get one file with all channels, which you can then export to individual mono files or edit as a multi-channel waveform. If you need track-by-track arrangement after recording, you'll need to export to a DAW. Sound Forge's strength here is the capture quality and the post-processing — if you want a fuller picture of where recording fits in its overall toolset, the Sound Forge Pro review covers that.
After Recording: What to Do With the File
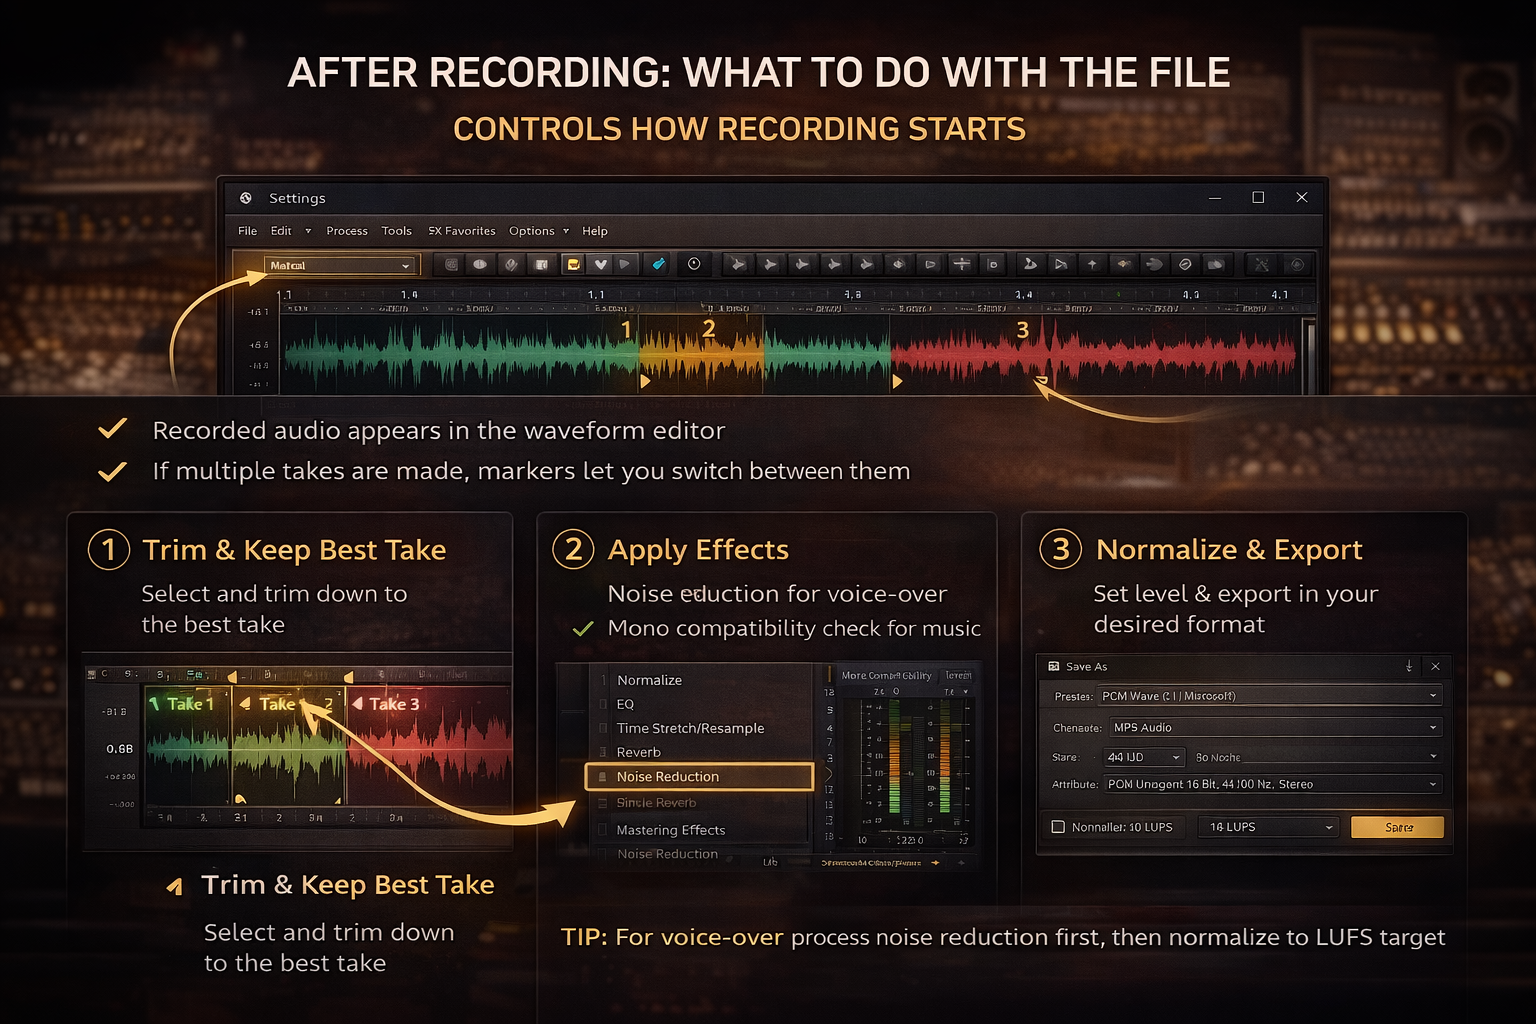
Once you stop recording, Sound Forge drops you back into the data window with the recorded audio sitting in the waveform editor. Nothing extra to close or confirm — you're immediately in editing mode.
If you recorded multiple takes in Multiple takes mode, each take is marked in the file. Navigate between them with the markers, audition each one, trim to the keeper. The markers stay visible in the waveform view.
For voice-over: noise reduction first, then normalize to your LUFS target, then export. For music: check mono compatibility before you commit to a mix decision — the mono-compatibility meter in View → Record Options stays open after recording and works on playback too. If you're still on the 15-day trial, recording counts toward your evaluation time the same as any other feature — no restrictions.
Frequently Asked Questions
Can Sound Forge Pro record multiple tracks at once?
Yes — up to 32 simultaneous channels — but it records them into a single interleaved file, not separate tracks on a timeline. Sound Forge is not a DAW. If you need post-recording multitrack arrangement, record in Sound Forge and bring the exported files into a DAW.
What's the best driver setting for recording in Sound Forge Pro?
ASIO, if your audio interface supports it. Lower latency, better performance, and direct access to multi-channel routing. For simple USB microphones or built-in audio where latency isn't a priority, Windows Classic Wave works without any driver setup.
Why isn't Sound Forge Pro detecting my microphone?
Check Windows Settings → Privacy & Security → Microphone and enable "Let desktop apps access your microphone." This is the most common cause. Also verify your driver is selected correctly in Options → Preferences → Audio. If you just installed the software and haven't run it through the Boris FX Hub yet, the installation guide covers the first-launch steps that need to happen before the audio device list populates correctly.
What does the prerecord buffer do in Sound Forge Pro?
It captures audio continuously while you're armed, before you click Record. When recording starts, the buffered audio is committed to disk — so your recording begins that many seconds before you hit the button. Useful for catching quiet starts and for threshold-triggered recording where the approach to threshold matters.
What's the difference between Automatic retake and Multiple takes mode?
Automatic retake rewinds and overwrites with each new take. Multiple takes advances forward and keeps everything. Use Automatic retake when you're doing short tests and don't need to archive the results. Use Multiple takes when you want every pass saved.
Can I record at 192 kHz in Sound Forge Pro?
Yes. Sound Forge Pro supports up to 64-bit/192 kHz. Your audio interface and its drivers need to support 192 kHz as well — not all interfaces do, and those that do often limit channel count at high sample rates. Check your interface's spec sheet before setting up a high-resolution session. The official Sound Forge system requirements page lists the minimum specs for the software side.