How to Add Reverb in Sound Forge Pro
Sound Forge Pro has three ways to add reverb to a file, and most people use only one of them — usually the quickest one, which isn't always the best one for the job. The built-in Reverb plugin is fast but limited in controls. Acoustic Mirror is a full convolution reverb engine with impulse responses of real spaces, and it's been part of Sound Forge since before most of the competitors existed. And the Plug-In Chainer opens the door to any VST or DirectX reverb you already own. Knowing when to reach for each one makes a real difference in results.
The Quickest Route: Effects → Reverb
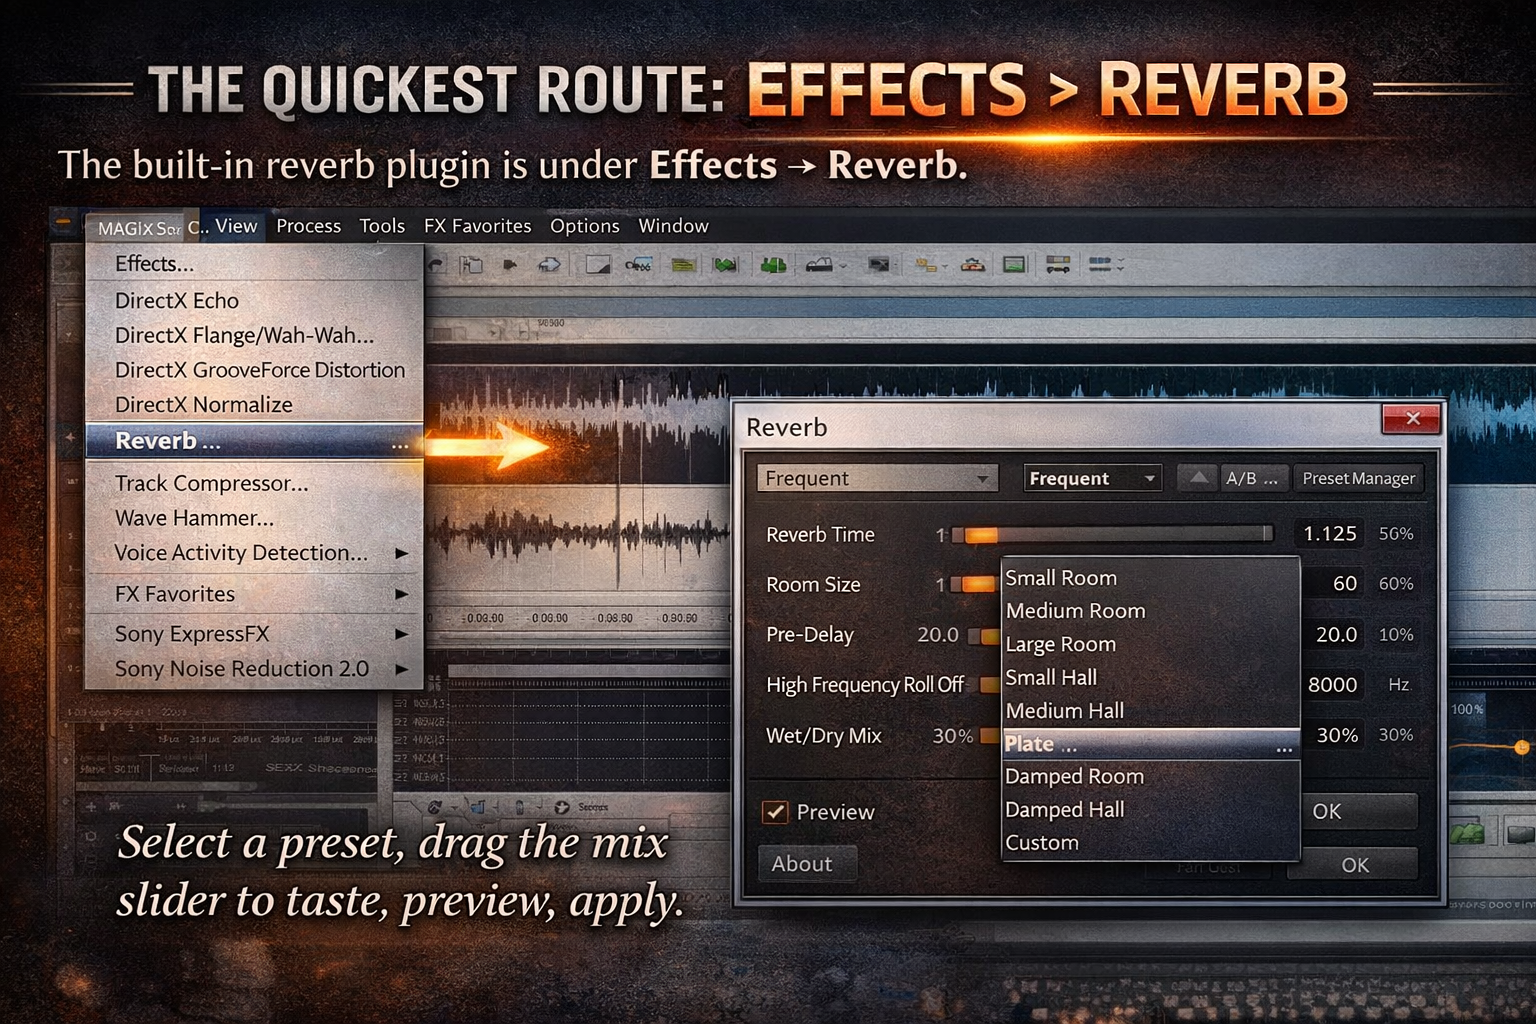
The built-in Reverb plugin is under Effects → Reverb. It opens a dialog with room type presets — small room, medium hall, large hall, plate, and variations — plus sliders for reverb time, predelay, and wet/dry mix. Select a preset, drag the mix slider to taste, preview, apply.
It's adequate for quick work where you need a bit of space on a voice or a sample and you don't want to spend time on it. The preset library covers the basic acoustic categories without much granularity — there's no impulse response, no per-frequency control, no stereo width adjustment. It's a studio reverb from the late 1990s in a convenient wrapper.
I used it for years on podcast intros and sound design spots where the reverb was essentially decoration — a voice-over with a slight room quality to make it sound less clinical. For that use case it works fine. For anything where the reverb character actually matters to the result, Acoustic Mirror is a better starting point.
Acoustic Mirror: Convolution Reverb with Real Spaces
Acoustic Mirror is under Effects → Acoustic Mirror, or accessible through the Plug-In Chainer. It's a convolution reverb engine — instead of algorithmically simulating a space, it uses impulse responses (.sfi files or standard .wav files) to reproduce the actual acoustic characteristics of recorded real spaces. Sound Forge ships with a library of impulse responses: concert halls, churches, studios, bridges, tunnels, and other environments. Sound On Sound's review of Sound Forge v8 describes Acoustic Mirror as one of the first professional convolution reverb implementations in a PC audio editor — it's been in Sound Forge longer than most reverb plugins have existed.
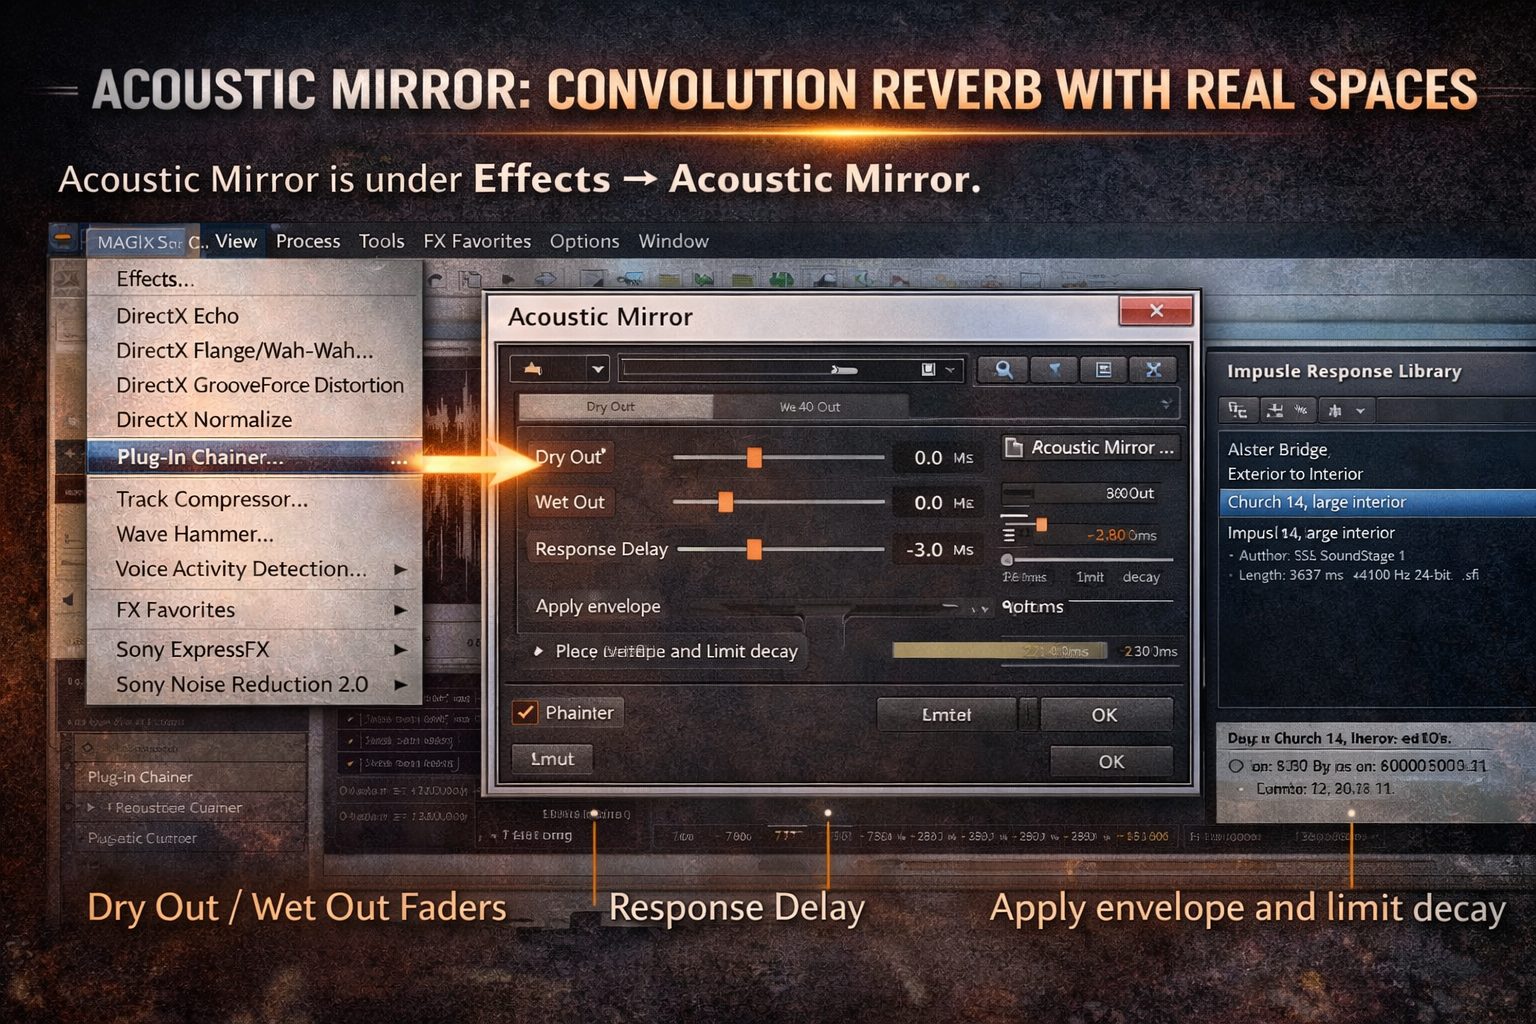
Dry Out / Wet Out faders — these control how much unprocessed and processed signal appears in the output. For natural room reverb, keep Dry Out up and Wet Out adjusted to taste — most natural-sounding reverb sits around -6 to -12 dB wet out relative to dry, not 100% wet. Setting Dry Out to -Inf and using only the Wet Out is useful for creating pure reverb tails for mixing, but applied directly to a file at full wet makes everything sound like it was recorded inside a cathedral without the source ever having been there.
Response Delay — the pre-delay, in milliseconds, before the processed reverb starts. Positive values create a gap between the dry signal and the reverb, which can clarify the direct sound in dense material. I added 23ms of pre-delay on a dialogue restoration project where the original room was too present — the gap created enough separation between voice and room to make the dialog intelligible without reducing the actual reverb amount.
Apply envelope and limit decay — this checkbox with a slider limits how long the reverb tail plays. On long impulse responses (large halls, cathedrals), the tail can extend several seconds. Limiting it to 1.5 or 2 seconds keeps the reverb audible without washing over the material that follows.
One known limitation: in 64-bit Sound Forge Pro 16 and later, .sfi impulse files from the original library can behave incorrectly — the reverb plays at half its natural length, with artifacts in the decay. .wav impulse files work correctly in 64-bit mode. If you're using the legacy .sfi library and the reverb sounds shorter or more metallic than expected, switch to equivalent .wav impulse files or use the 32-bit version of Sound Forge for that session.
The Plug-In Chainer: Full Control with VST and DirectX Reverbs
The Plug-In Chainer (View → Plug-In Chainer, or FX Favorites → Apply Plug-In Chain) is where Sound Forge Pro's reverb workflow opens up fully. Any VST or DirectX reverb plugin installed on your system is accessible here. Load a reverb, adjust settings, preview, apply.
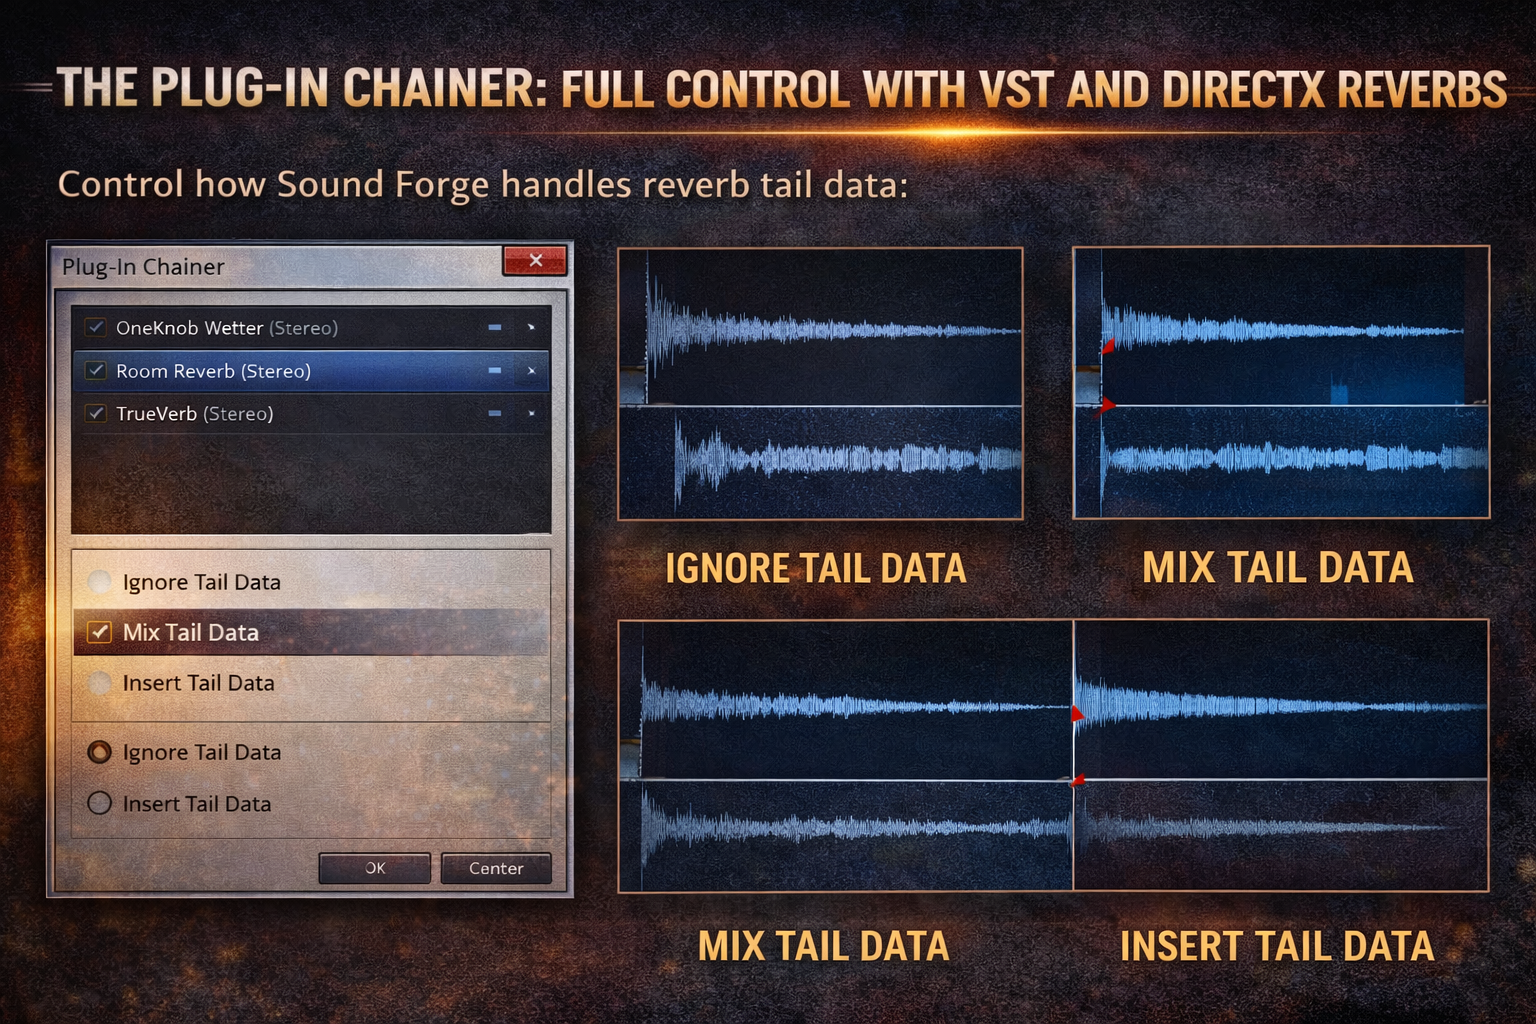
Reverbs generate audio beyond the end of the selection — the decay continues after the source sound stops. The Chainer gives you three options for how Sound Forge handles this tail data:
Ignore Tail Data — the reverb cuts off abruptly at the end of the selection. This sounds unnatural on most material but can be useful for specific sound design work where you want a hard edit.
Mix Tail Data — the reverb tail is mixed into whatever audio follows the selection. This is the most natural-sounding option for most use cases — the reverb decays naturally without creating an audible gap or abrupt cutoff at the edit point.
Insert Tail Data — the reverb tail is inserted into the file after the selection ends, extending the total file length. Use this when the file needs to contain the full reverb decay as part of its content — final music tracks, effects recordings, or any situation where the tail needs to be audible in its entirety without overlapping with other material.
Getting this wrong is the most common reverb mistake I've seen in Sound Forge. Someone applies reverb through the Chainer with Ignore Tail Data selected, and the result sounds like the room suddenly disappeared at the last beat. Mix Tail Data is the right default for most work.
Applying Reverb to a Selection vs the Whole File
Sound Forge Pro is a destructive editor — reverb applied through any of these methods modifies the file permanently (unless you undo). Before applying, decide whether you want reverb on the entire file or just a section.
For the entire file: Ctrl+A to select all, then apply reverb. The tail data setting in the Plug-In Chainer determines what happens after the last sample.
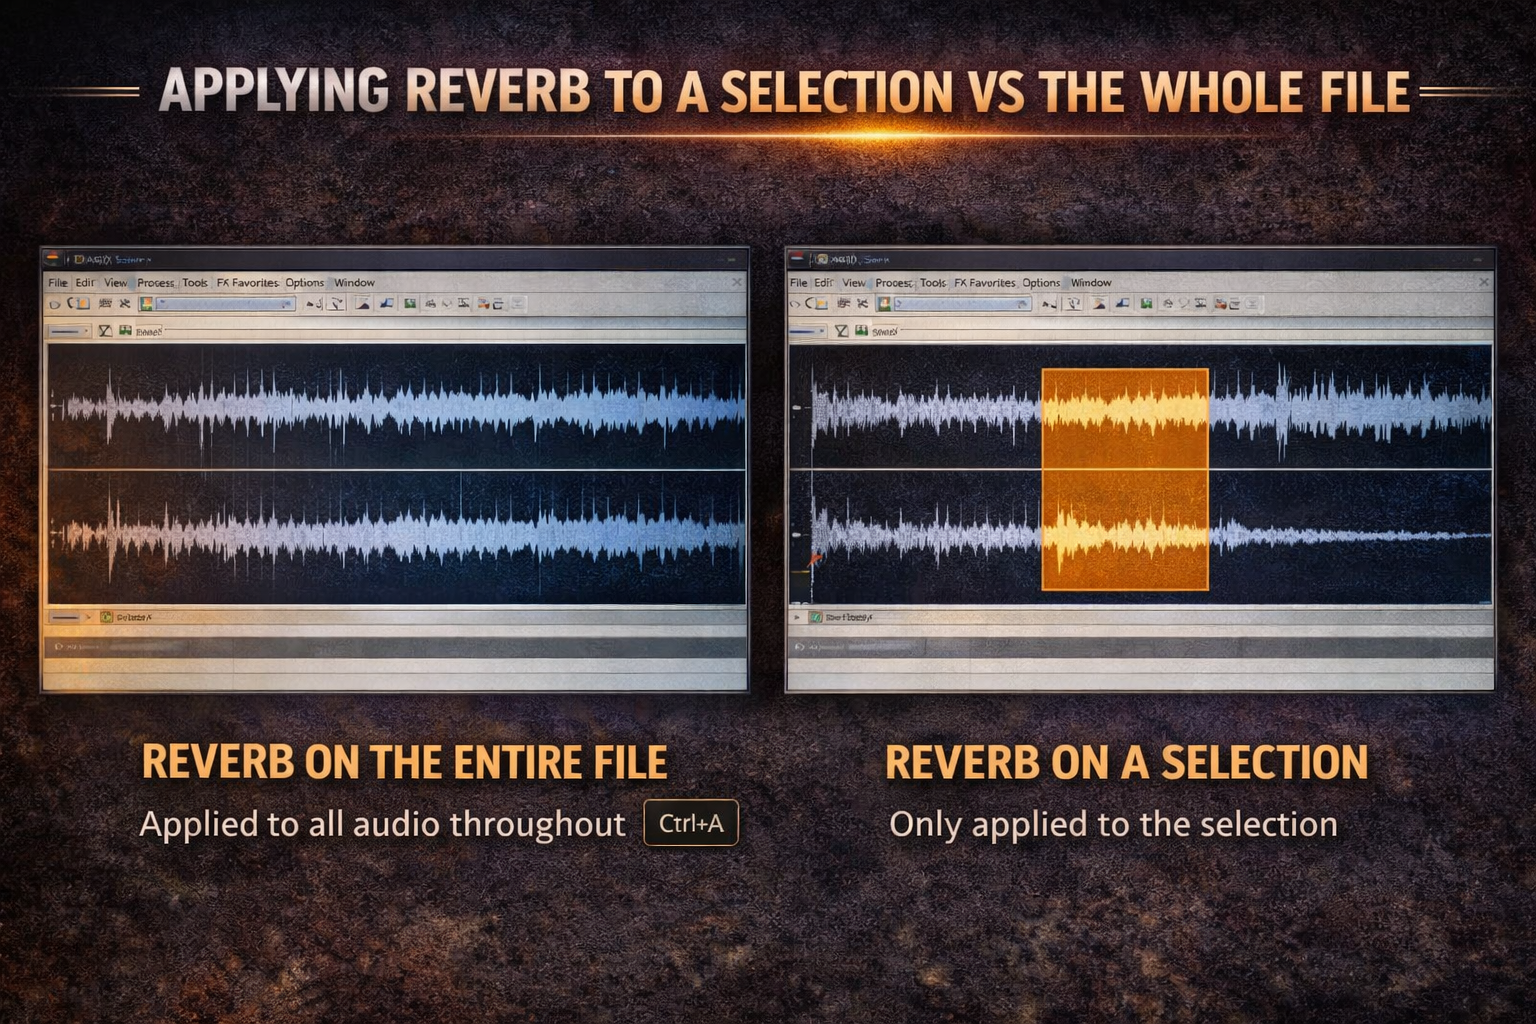
For a specific region: drag a selection over the section you want to treat, then apply. With Mix Tail Data selected, the reverb tail blends into the audio that follows the selection — this is the right approach for treating a specific vocal phrase or instrument hit within a longer file without affecting the surrounding audio.
A workflow I've used often on dialogue restoration: select only the dry sections where the room character needs to be matched to the rest of the recording, apply Acoustic Mirror with a low wet level, Mix Tail Data on. The reverb treatment blends into the surrounding material without double-processing sections that already have the right room character.
3D Reverb: Sound Forge Pro 18
Sound Forge Pro 18 added a 3D Reverb FX feature that moves beyond stereo reverb — it creates virtual room simulations that can extend to up to 10 channels, useful for immersive audio work and spatial sound design. It's accessible under the Effects menu in SF Pro 18 and later. Full specs for the current version are on the Sound Forge product page.
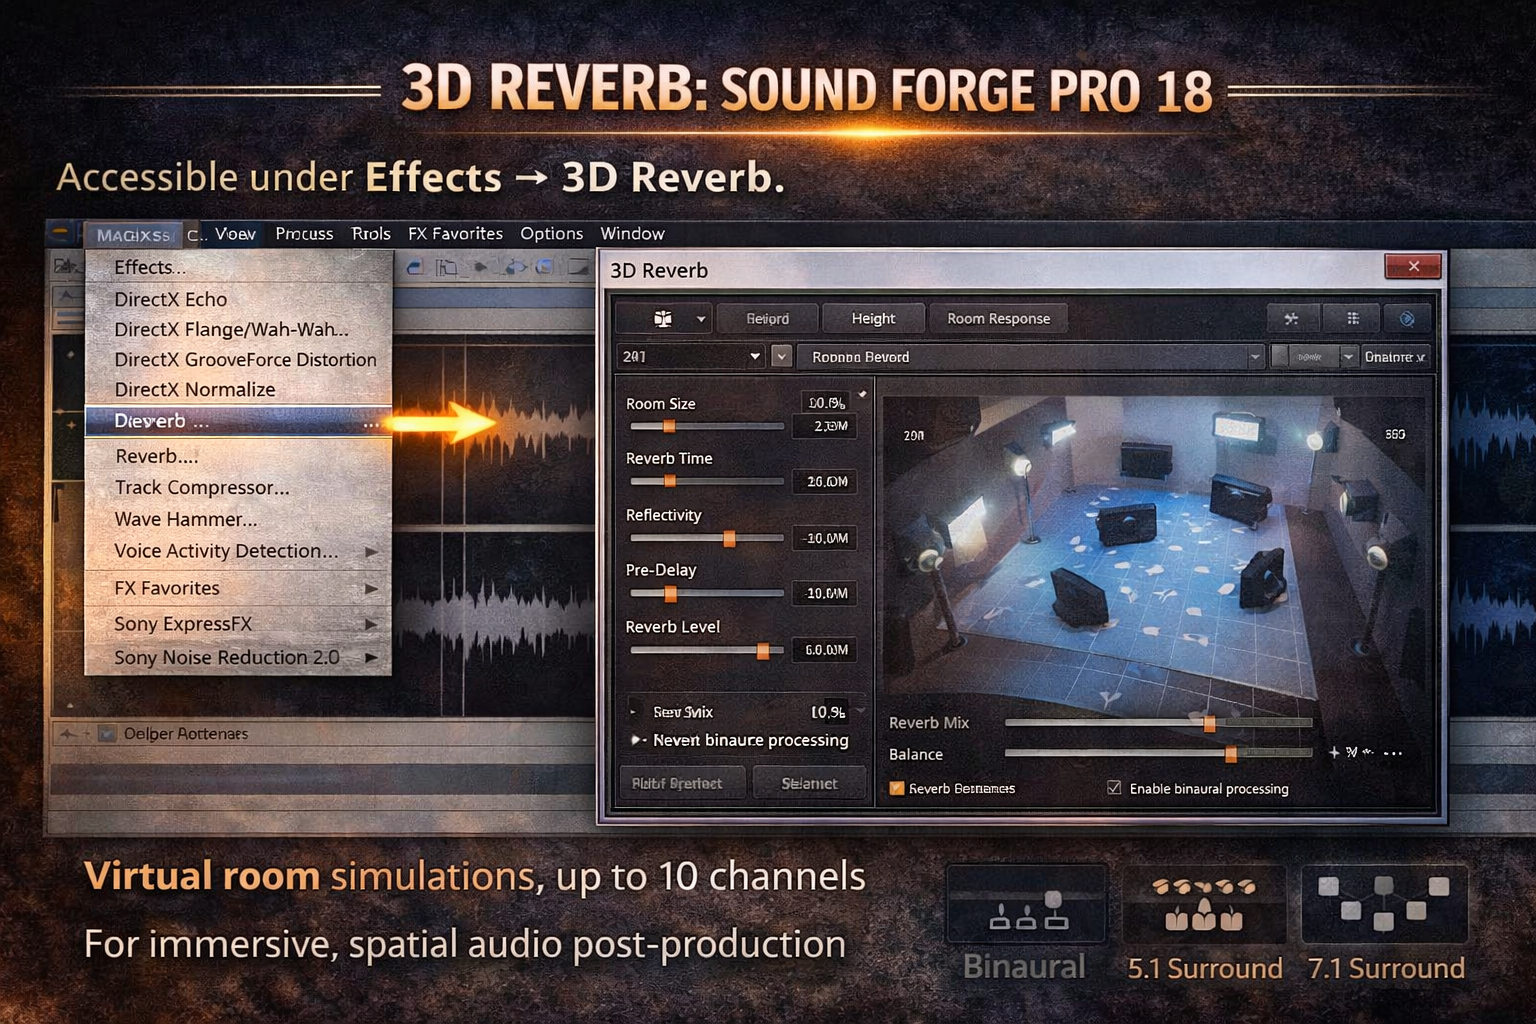
For standard stereo mastering and post-production work, the built-in Reverb and Acoustic Mirror remain the primary tools. 3D Reverb is the right choice when the output format requires spatial placement — binaural mixing, surround, or immersive audio deliverables. For a full overview of what changed in the current version, the Sound Forge Pro review covers the complete feature set in context.
Wet/Dry Balance
The most consistent mistake across all three reverb methods is setting the wet signal too high. 100% wet — only the reverb output, no dry signal — is appropriate for creating a reverb return in a DAW mix where you're routing audio to an aux send and the source track provides the dry signal. Applied directly to a file in a destructive editor with Dry Out at -Inf, the result is a file that sounds like the source was recorded inside the reverb, not placed in front of it.
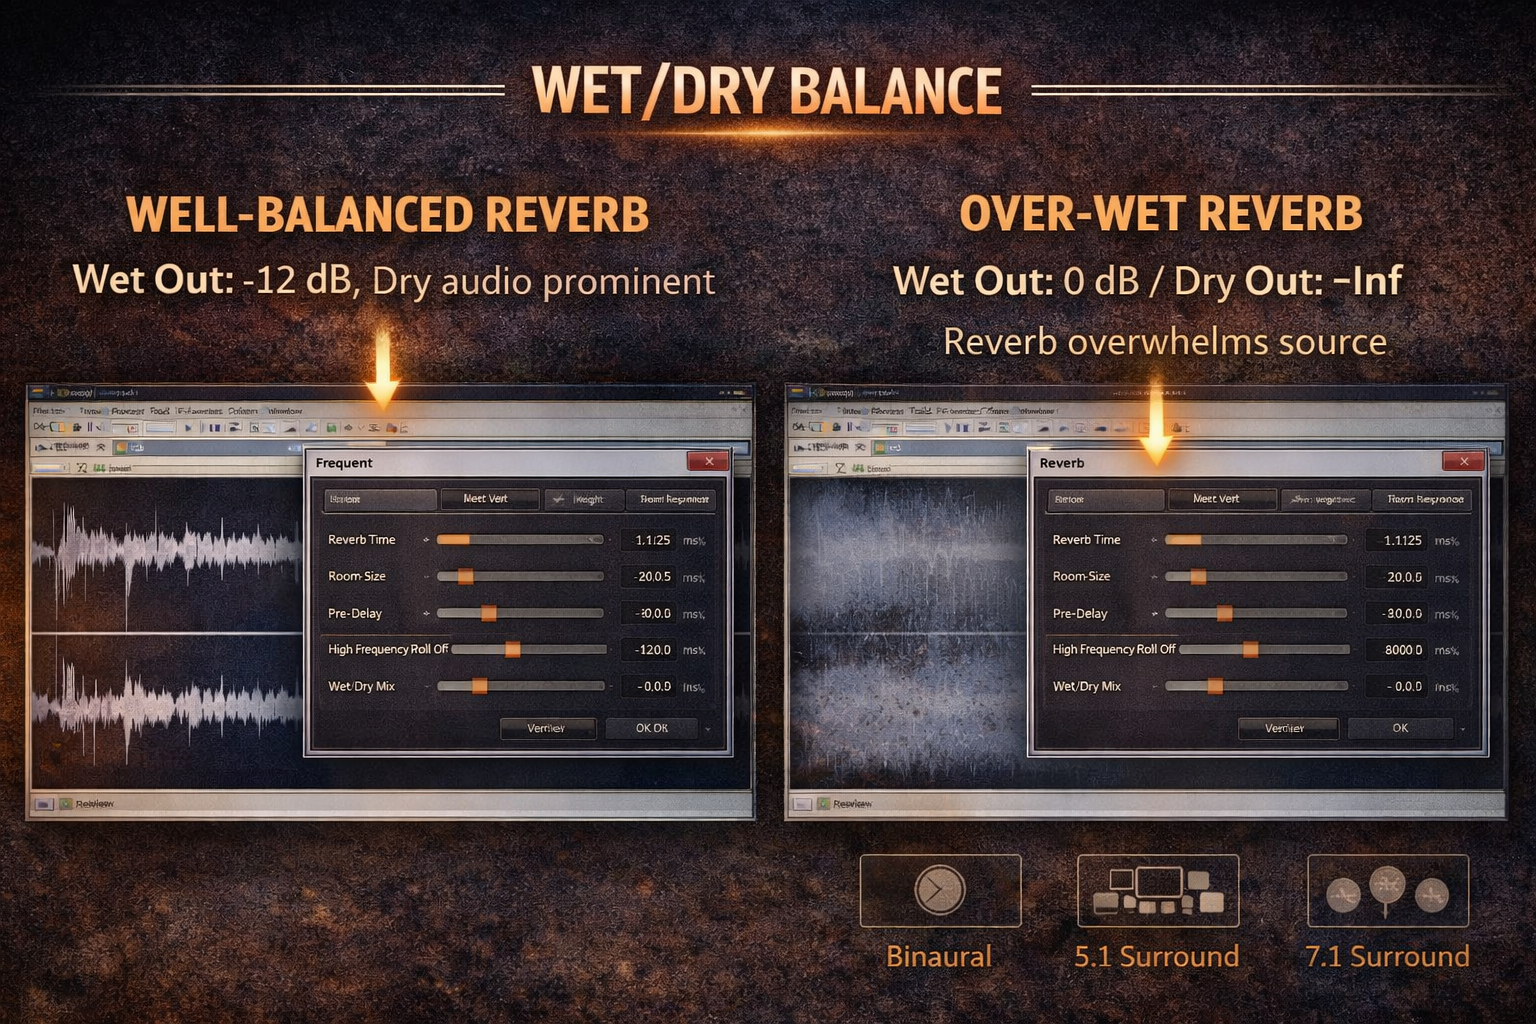
For most practical use — adding room to a dry recording, matching a new take to an existing room, creating depth on a final mix — the dry signal should be audible and the wet signal should sit behind it. In Acoustic Mirror: Dry Out at 0 dB, Wet Out somewhere between -8 and -18 dB depending on how pronounced the effect should be. In the built-in Reverb plugin: wet/dry mix around 20–40%. Preview before applying — the difference between a well-balanced reverb and an over-wet one is easy to hear in preview and almost impossible to fix without starting over after applying.
I ruined a finished vocal restoration once by applying Acoustic Mirror at full wet without previewing. Forty minutes of cleanup work overwritten in one click because I didn't audition it first. The Bypass checkbox in the preview dialog exists for a reason — use it to A/B the processed and dry signal before you commit.
Frequently Asked Questions
How do I add reverb in Sound Forge Pro?
Three methods: Effects → Reverb for the basic built-in reverb with room presets; Effects → Acoustic Mirror for convolution reverb using real-space impulse responses; or View → Plug-In Chainer to load any VST or DirectX reverb plugin. For most professional work, Acoustic Mirror or a quality VST through the Plug-In Chainer produces better results than the built-in Reverb plugin.
What is Acoustic Mirror in Sound Forge Pro?
Acoustic Mirror is Sound Forge Pro's convolution reverb engine. It uses impulse response files (.sfi or .wav) that capture the acoustic characteristics of real spaces — concert halls, churches, studios — and applies those characteristics to your audio. It produces more natural-sounding reverb than algorithmic plugins because it's based on recordings of actual environments rather than mathematical simulations. Sound Forge ships with a library of impulse responses, and any .wav impulse response file works with it.
What is tail data in Sound Forge Pro reverb?
Tail data is the reverb decay that continues after the source audio ends. In the Plug-In Chainer, you choose how Sound Forge handles it: Ignore Tail Data cuts the reverb off abruptly (rarely sounds natural), Mix Tail Data blends the decay into the audio that follows (the right choice for most work), Insert Tail Data extends the file length to include the full decay. Always check this setting before applying reverb — the default may not match what you need.
How do I control the wet/dry mix in Acoustic Mirror?
Use the Dry Out and Wet Out faders on the General tab. Dry Out controls the unprocessed signal level; Wet Out controls the reverb level. For natural-sounding reverb, keep Dry Out at 0 dB and reduce Wet Out to -8 to -18 dB depending on the desired depth. Setting Dry Out to -Inf gives you only the reverb signal — useful for creating reverb returns in a DAW but overly wet when applied directly to a file.
Can I use third-party reverb plugins in Sound Forge Pro?
Yes — any VST or DirectX reverb plugin installed on your system works through the Plug-In Chainer (View → Plug-In Chainer). Load the plugin, adjust settings, preview, then click Process Selection to apply. Sound Forge Pro supports VST, VST3, and DirectX plugin formats. The 15-day free trial includes full plugin support — any third-party reverbs you own work in the trial without restriction.
Why does my Acoustic Mirror reverb sound wrong or too short?
If you're using .sfi impulse files in the 64-bit version of Sound Forge Pro 16 or later, there's a known compatibility issue — .sfi files play at half their correct length due to 32-bit plugin behavior in a 64-bit host. Use .wav impulse response files instead, which work correctly in 64-bit mode. If you specifically need the original .sfi library, the 32-bit version of Sound Forge (installed alongside the 64-bit version without consuming an extra activation) handles them correctly.
What's the difference between reverb and Acoustic Mirror in Sound Forge Pro?
The built-in Reverb plugin uses a synthetic algorithm to simulate spaces — it generates reverb mathematically based on parameters like room size and decay time. Acoustic Mirror uses convolution — it applies the actual recorded acoustic signature of a real space to your audio. Acoustic Mirror is more realistic for natural-sounding spaces; the built-in Reverb is faster to apply and sufficient for less critical work. Once reverb and other processing are done, the MP3 export guide covers how to get the finished file out of Sound Forge.